
Build and deploy your app
Build and deploy your app with whichever method suits you — web console, Claude Desktop, ChatGPT Desktop, or terminal.
Follow this document and you'll build your first app and finish its first deploy. Pick whichever of the four methods you like — the result is the same either way.
You get a GitHub repository holding template code, and an app with its own address.
What you need (all methods)
- An AxHub account — this is where your app will live. Ask your company's
tenant_admin(the person who manages the company account) for an invite. - A GitHub account — where your app code will be kept. Any personal account that can install the axhub GitHub App works, and a company organization (org) account is fine too.
The Claude Desktop and ChatGPT Desktop methods need their apps — each tab starts from installation. The terminal method only needs the axhub CLI.
Pick how you'll build it
All you need is a browser. On the AxHub web console's Create app page, pick a template, click Finish once, and AxHub handles everything from creating the repository to the first deploy.
Fill in the basics
In the apps menu, click Create app and fill in the three fields under Basic info at the top.
Start with the app name — the subdomain and slug are filled in automatically based on it. If you don't like them, edit each field directly.
| Field | What it is | Rules |
|---|---|---|
| App name | The display name your coworkers will recognize | 1–100 characters, Korean is OK |
| Subdomain | The internet address for reaching the app — it becomes {subdomain}.{company}.axhub.ai | Starts with a lowercase letter; lowercase letters, digits, hyphens; 2–32 characters |
| Slug | A short English name that identifies the app within your company. You use it to refer to this app in admin screens and commands | Starts with a lowercase letter; lowercase letters, digits, hyphens; 3–50 characters |
If you type the app name in Korean, the subdomain and slug are not filled in automatically. Enter those two fields yourself in English. (Example: name 내 할일 → subdomain and slug my-todo)
Pick a template
This step decides what code you start from. The template's code goes straight into your new repository, so you start with an app that already works, not a blank screen.
| Template | Good for |
|---|---|
| Vite + React SPA | Front-end-only apps — the fastest start. It runs only in the browser, but calling external APIs is fine |
| Next.js App Router | Apps that need both a front end and a server — the server can read and store data |
| Astro | Content-first sites and blogs — mostly static screens, with only the parts that need it made interactive |
Not sure? For a web app that needs both a front end and a server, Next.js App Router; for a light, single-screen app, Vite + React SPA is a safe start.
Connect a Git repository
This step creates the GitHub repository that will hold your app code.
Install the GitHub App (first time only)
Name the repository
If a repository with the same name already exists, this fails (repo_exists). Try again with a different name.
Finish — all the way to a deploy
Click Finish and a progress screen appears, running through the steps below automatically. There's nothing else to click along the way.
Create app → create repository → add template code → connect → deployWhen it's done, you land on the In development tab and your app gets its address (URL).
Claude Desktop is the Claude app you use right on your computer without opening a browser. Install the axhub plugin there once, and you can build and deploy apps through conversation alone. Installation is a one-time thing.
Install the Claude Desktop app
If you don't have the Claude desktop app yet, download the installer for your operating system (macOS or Windows) from claude.ai/download and install it. Open the app and sign in with your Claude account, and you're ready.
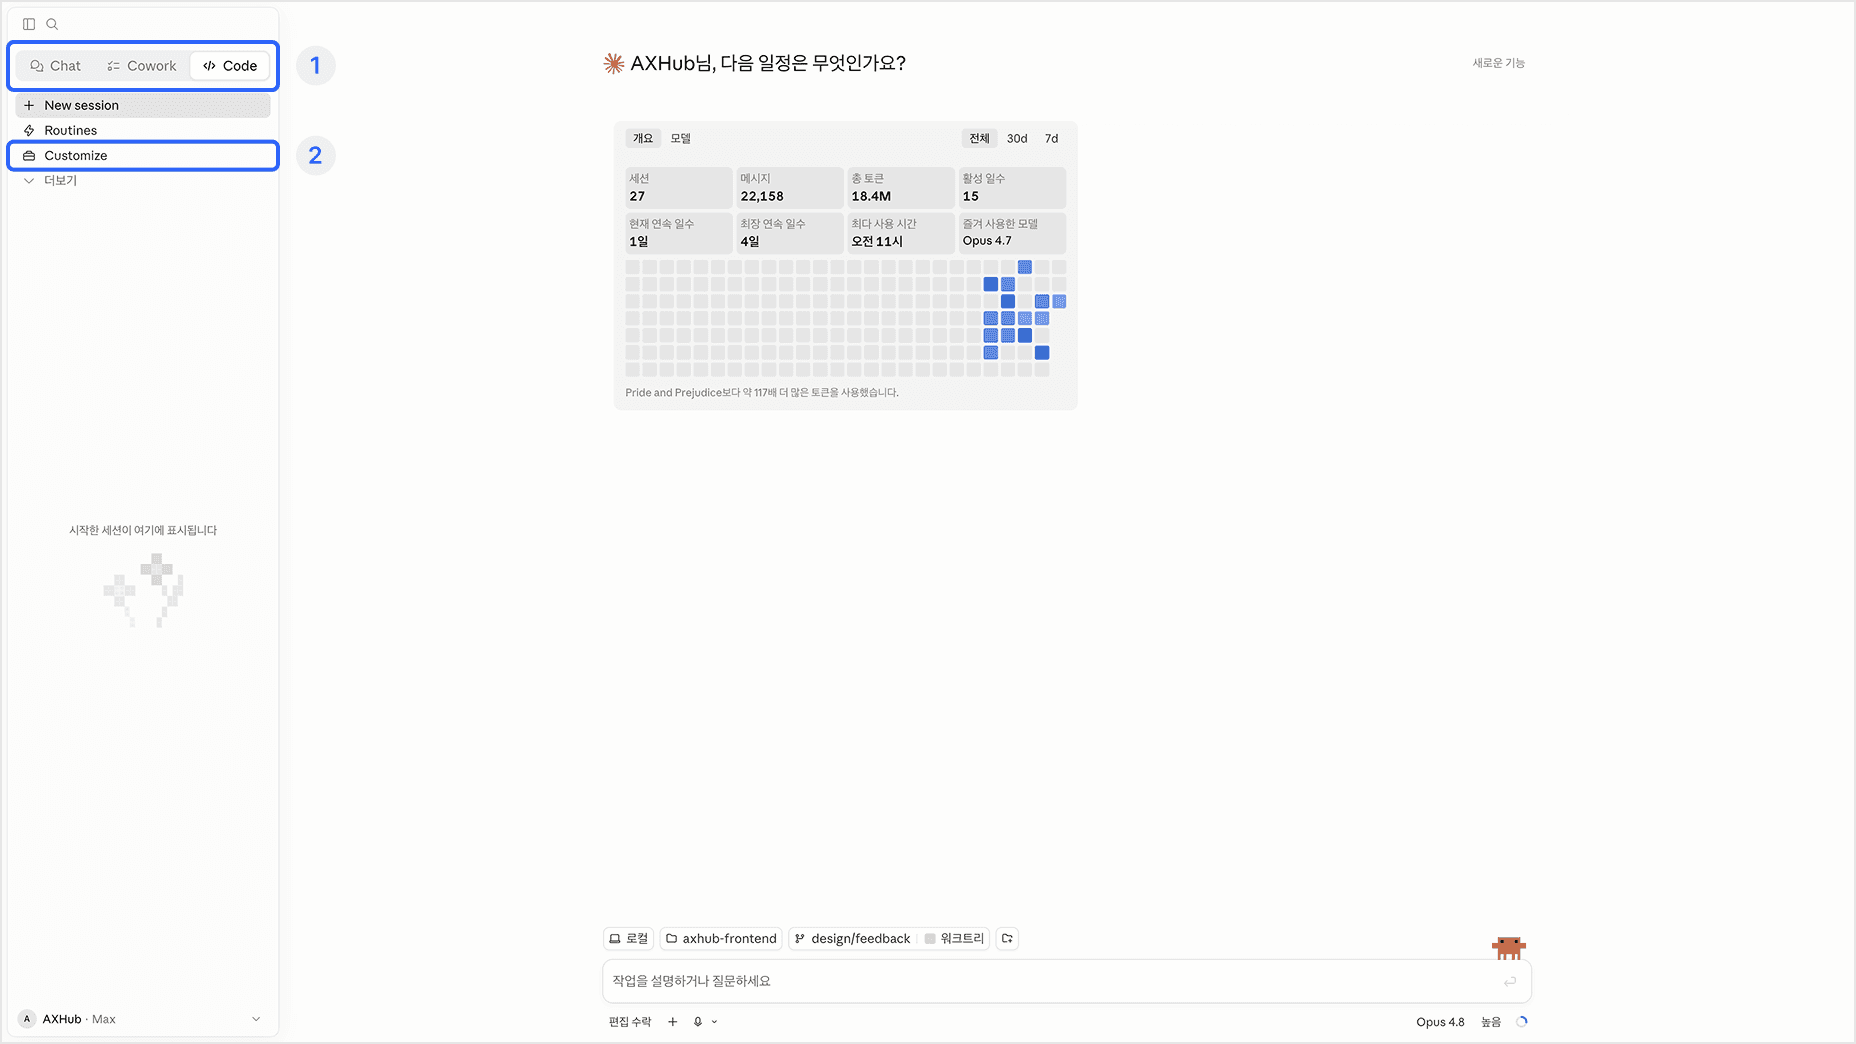
Go to the Customize page
This step takes you to the screen where plugins are managed.
When you first open the app, the tab at the top left is probably set to Chat. Switch to the Code tab, then click Customize in the submenu.
Add the marketplace
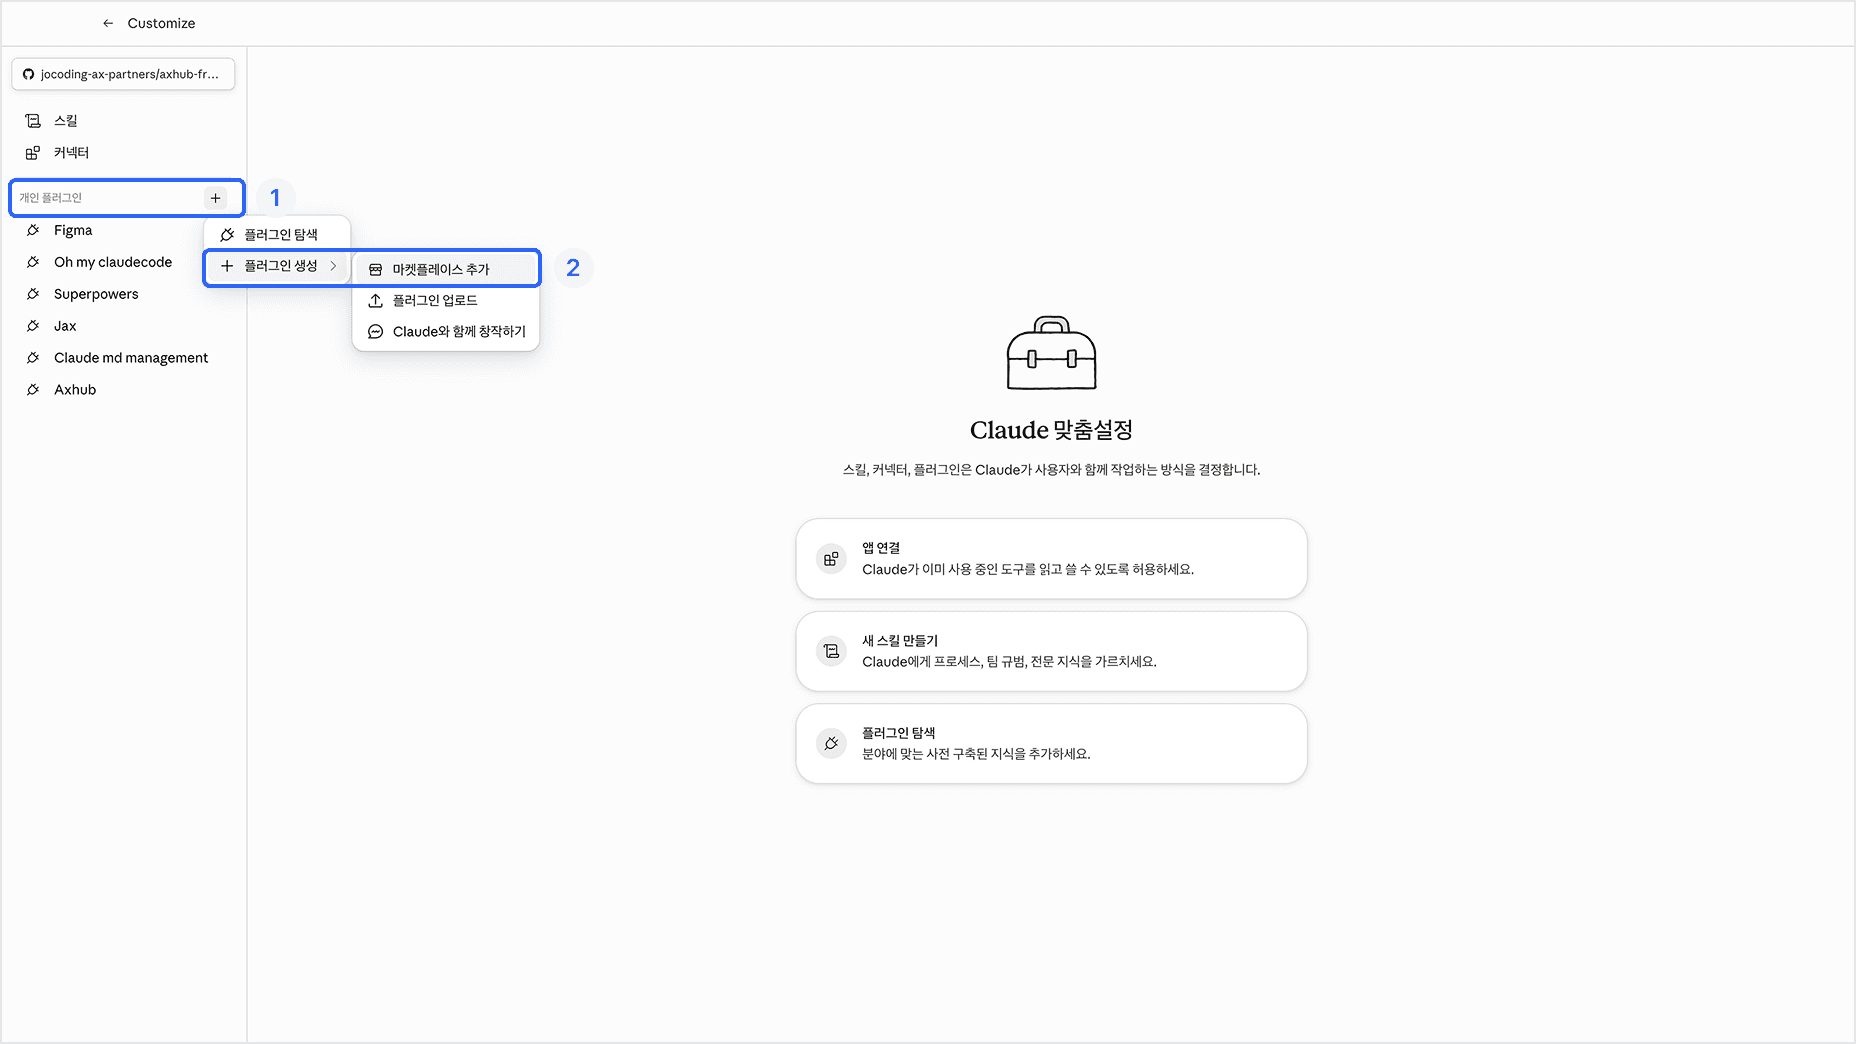
This step registers the warehouse (marketplace) that holds the axhub plugin with Claude.
On the Customize page, click the "+" (add plugin) button to the right of personal plugins, then click Create plugin and Add marketplace in turn.
In the add-marketplace modal, click Add from repository and paste the address below into the URL field.
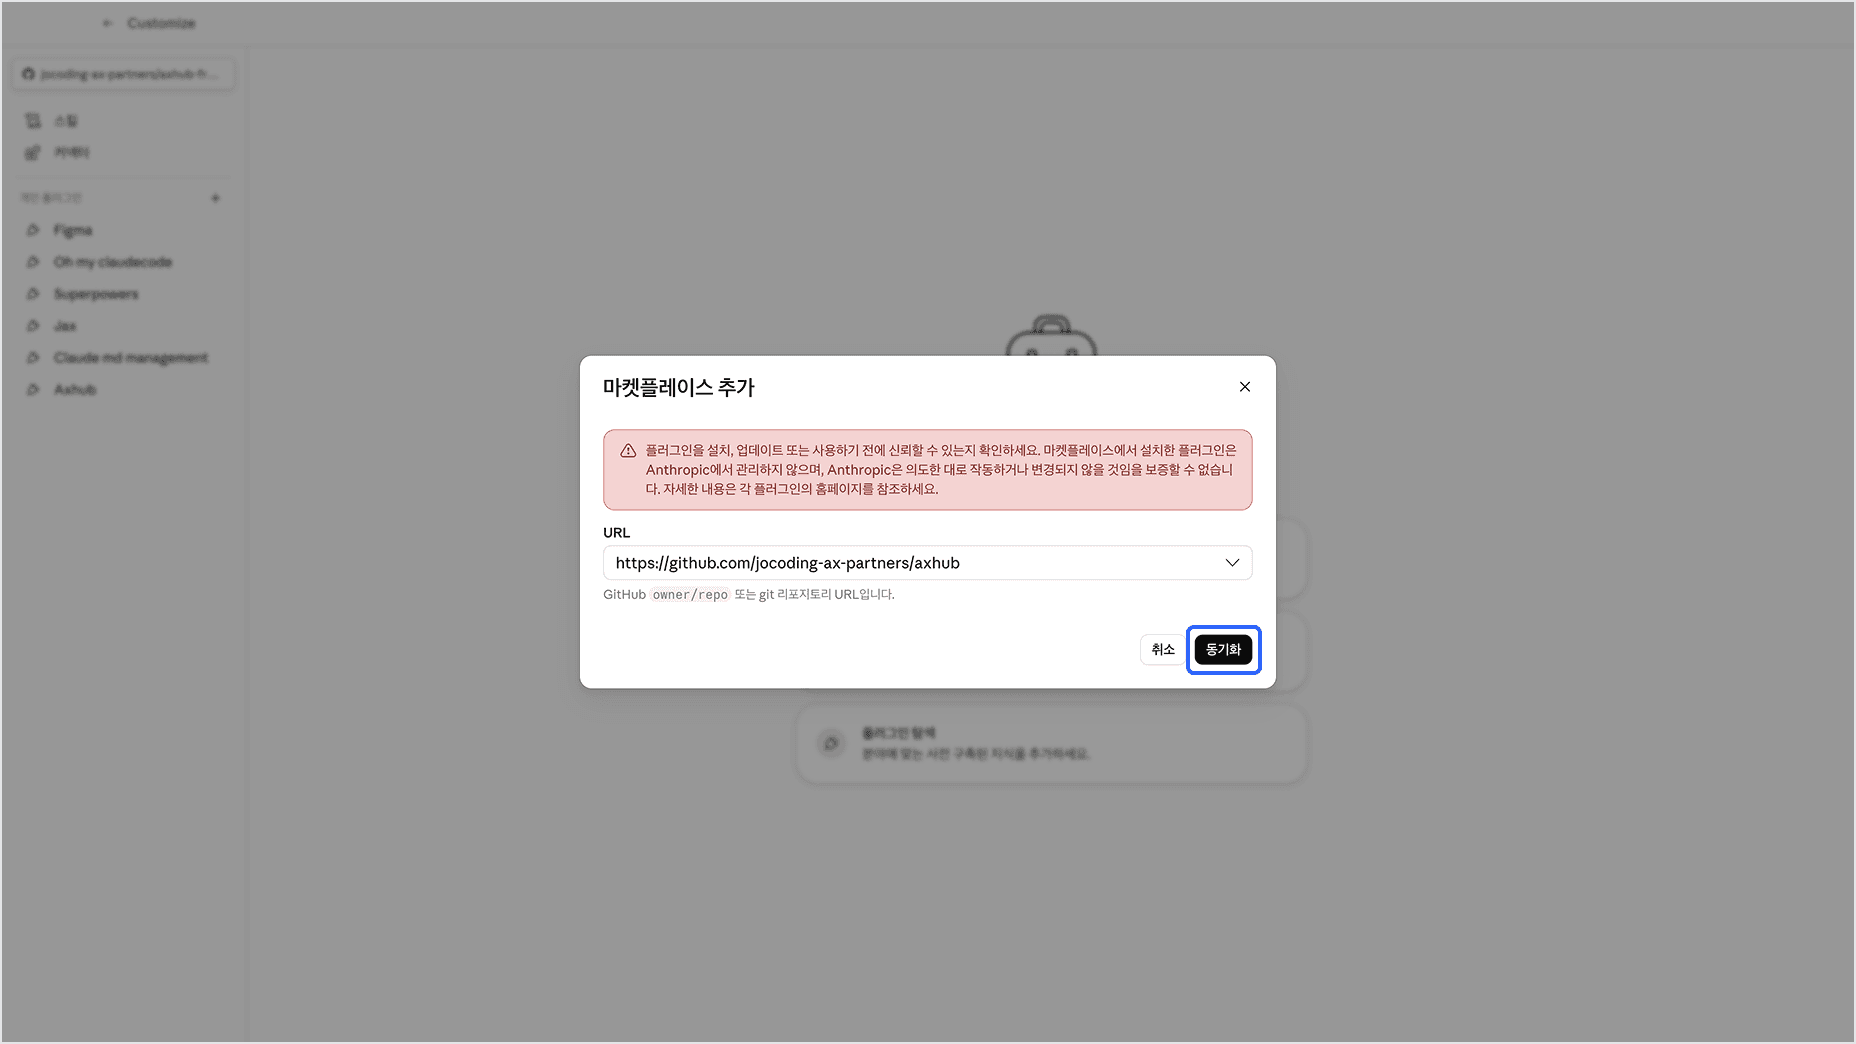
https://github.com/jocoding-ax-partners/axhub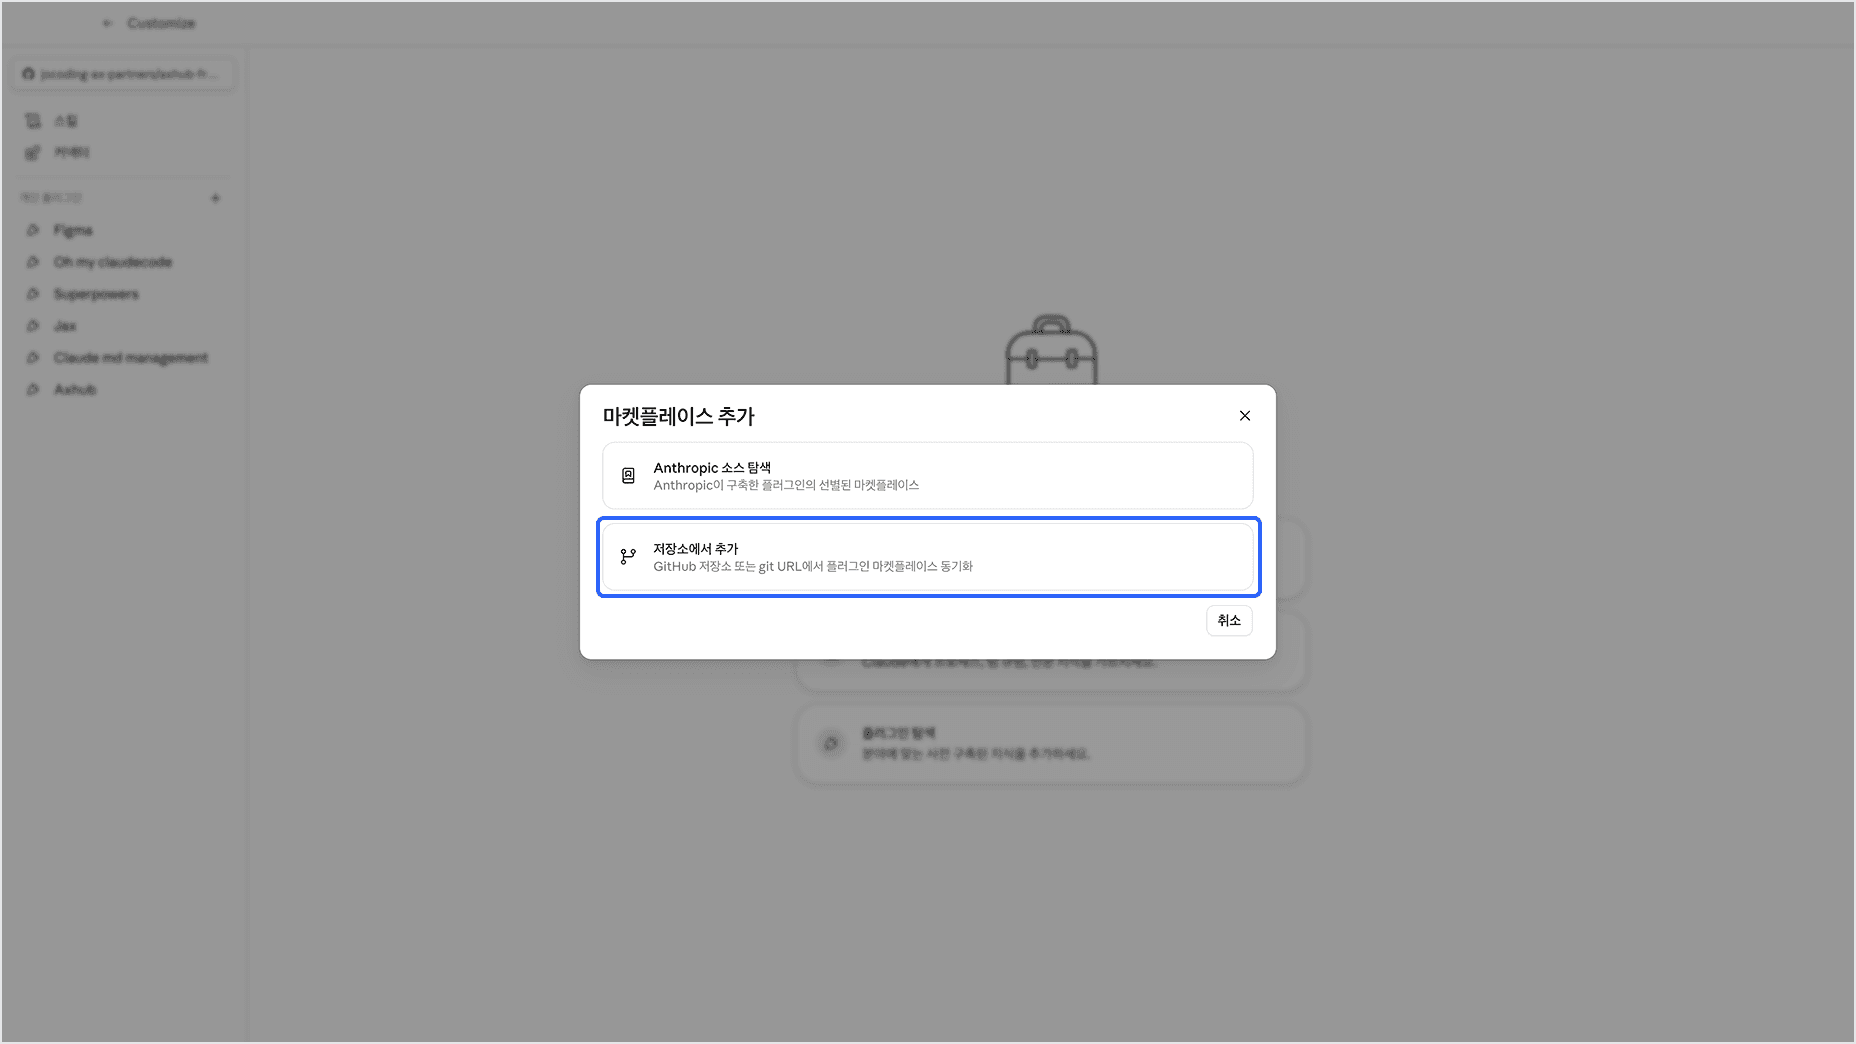
Check the URL, then click the Sync button.
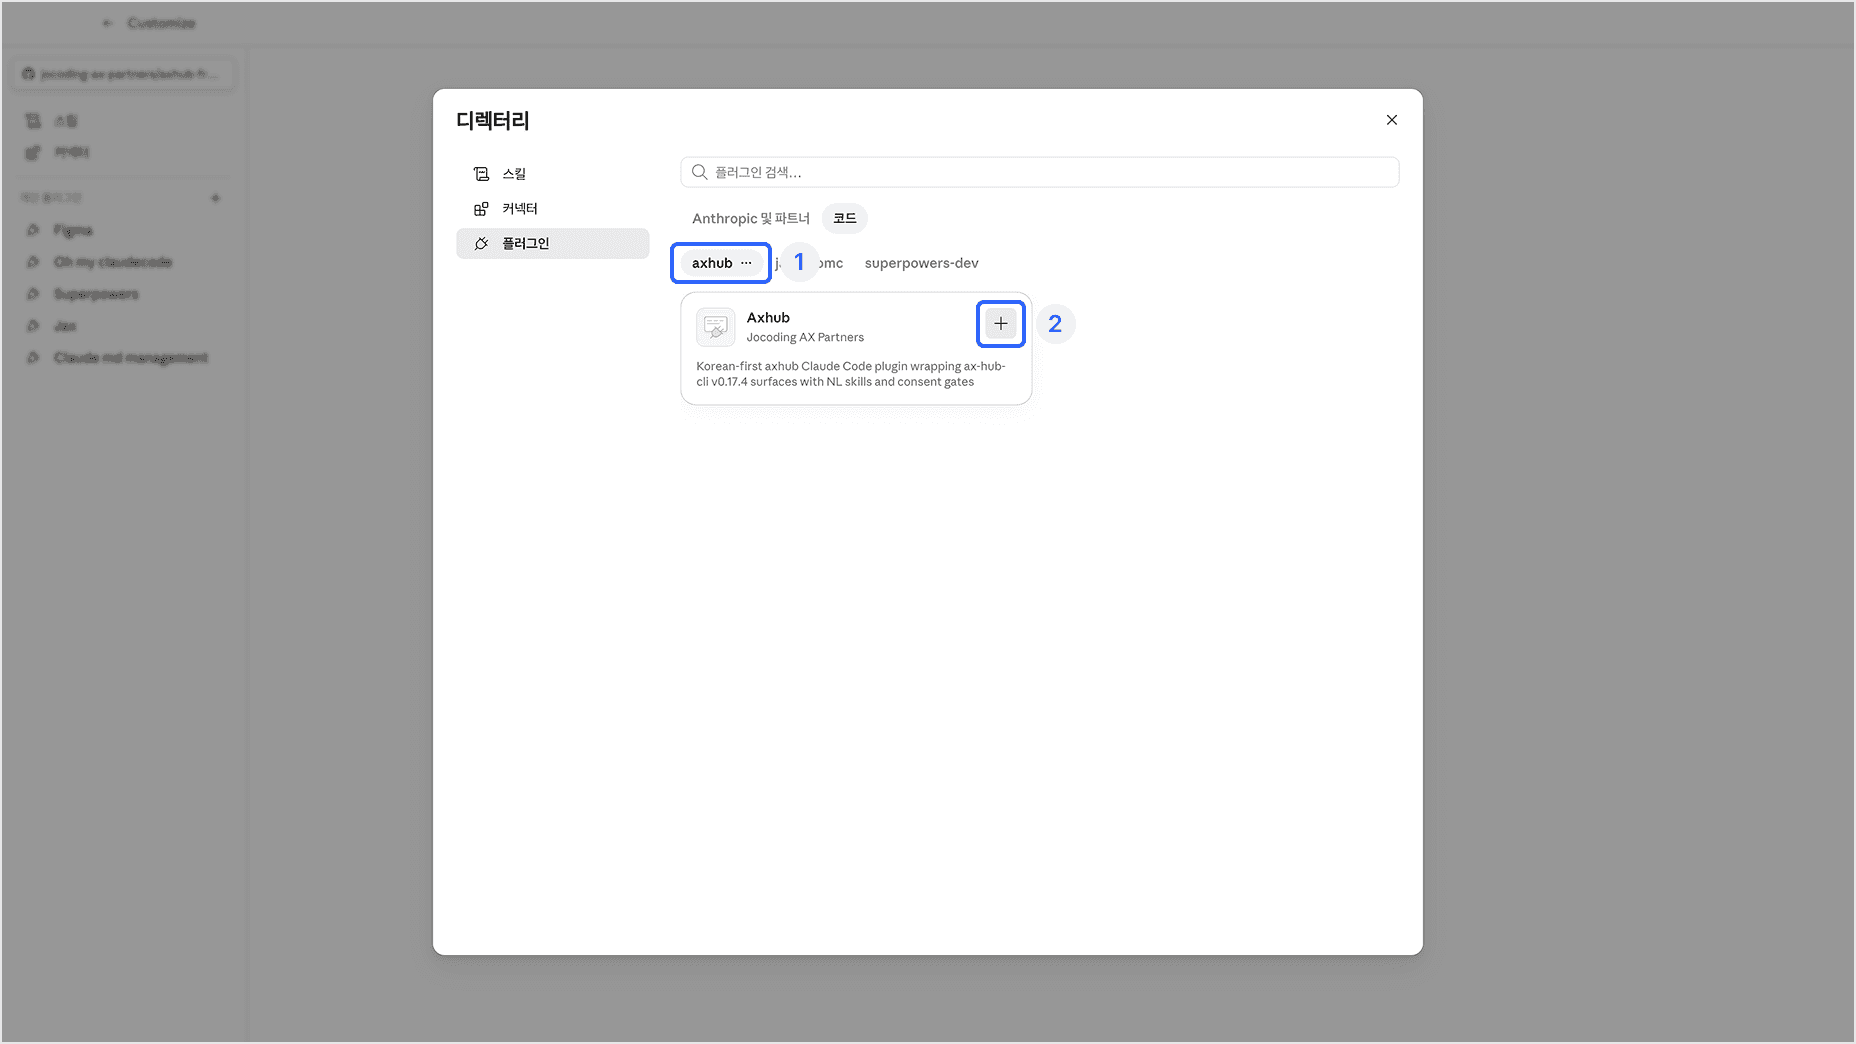
Install the AXHub plugin
This step actually installs the AXHub plugin from the marketplace you registered. Click the "+" button and the plugin is installed.
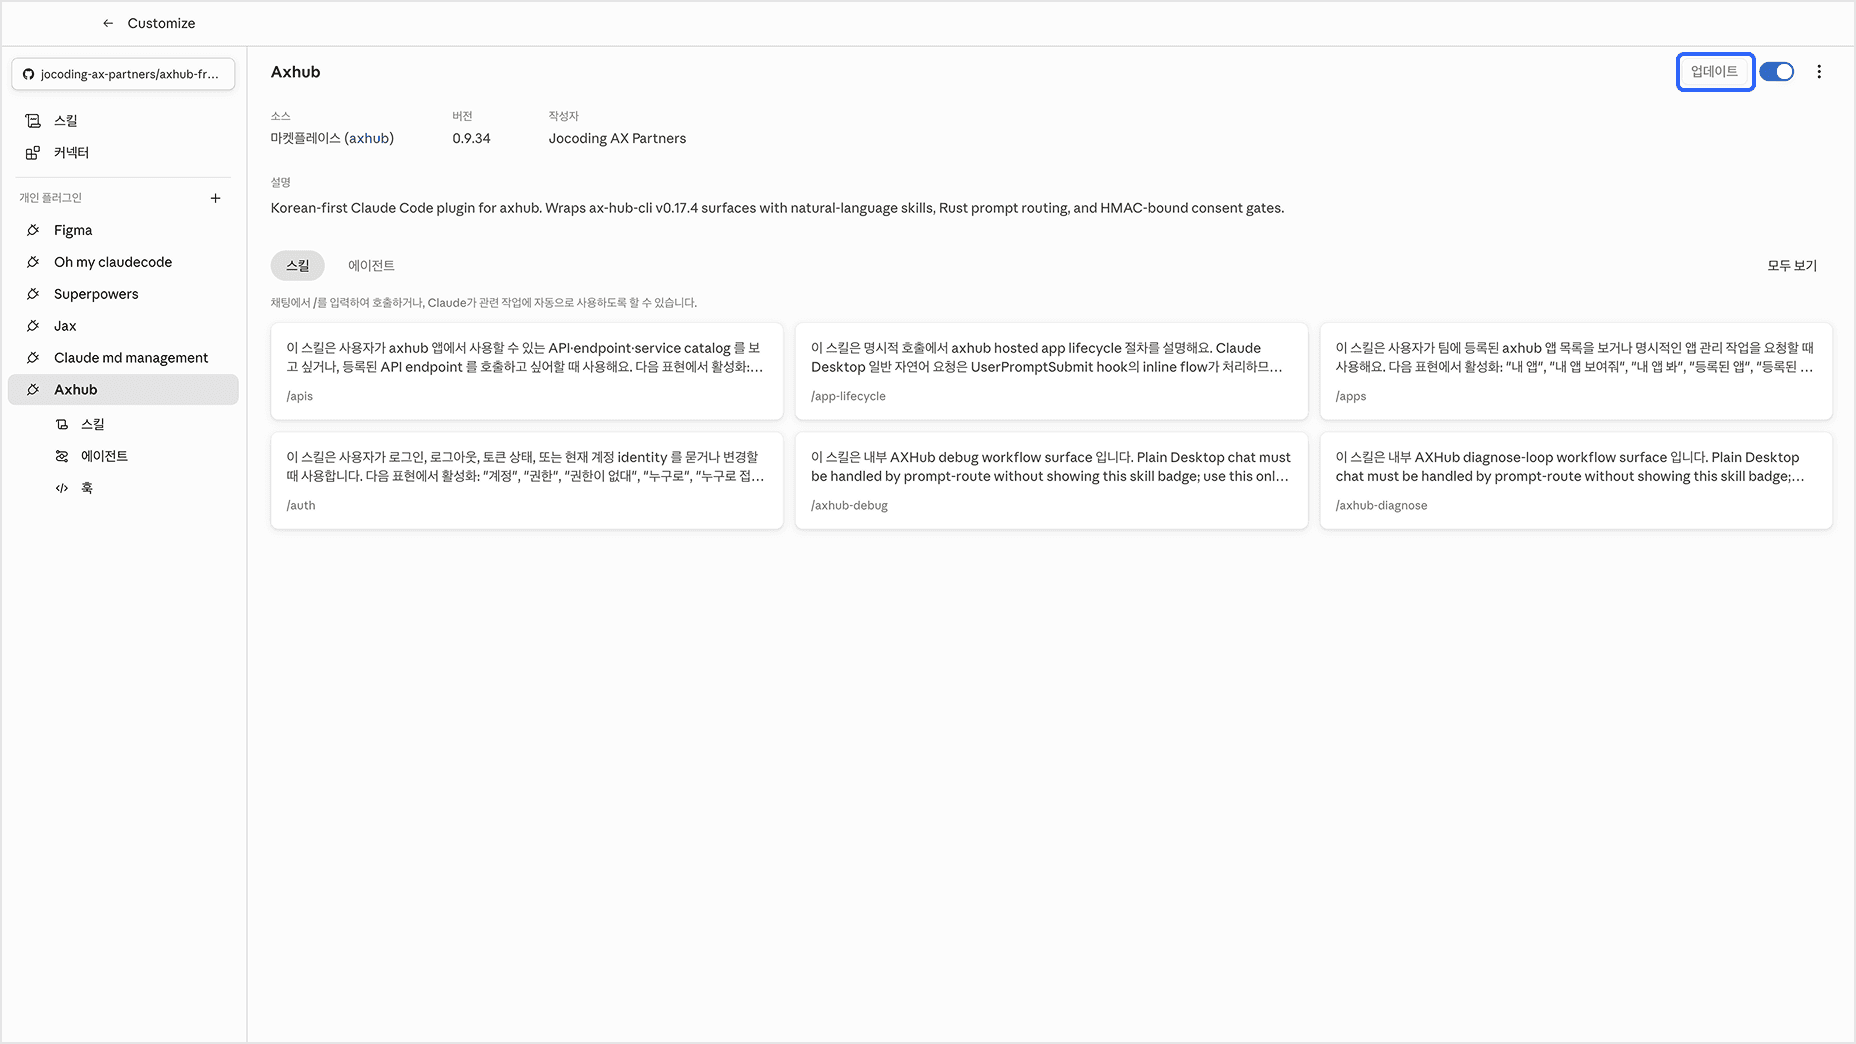
You can now find the AXHub plugin under directory modal > Plugins > Code. Click the "..." button to check for updates.
If the Update button on the plugin page is lit, click it to update.
Onboard and create an app
You're all set! In the Code tab, ask Claude:
run onboardingIt walks you through the remaining requirements (axhub login and so on) one by one. Once onboarding is done, just say this.
I want to create an app on axhubThe plugin runs everything from picking a template to creating the repository and the first deploy in one go, and gives you the app's address (URL) when it's done.
ChatGPT Desktop is the ChatGPT app you use right on your computer without opening a browser. Install the axhub plugin in its Codex mode, and you can build and deploy apps through conversation alone. Installation is a one-time thing.
Install the ChatGPT desktop app
If you don't have it yet, download the installer for your OS (macOS · Windows) from chatgpt.com/download. Open the app and sign in with your ChatGPT account, and you're ready.
Switch to Codex mode
When you first open the app, the mode at the top left is probably set to ChatGPT. Click the mode switcher at the top left, then click Codex.
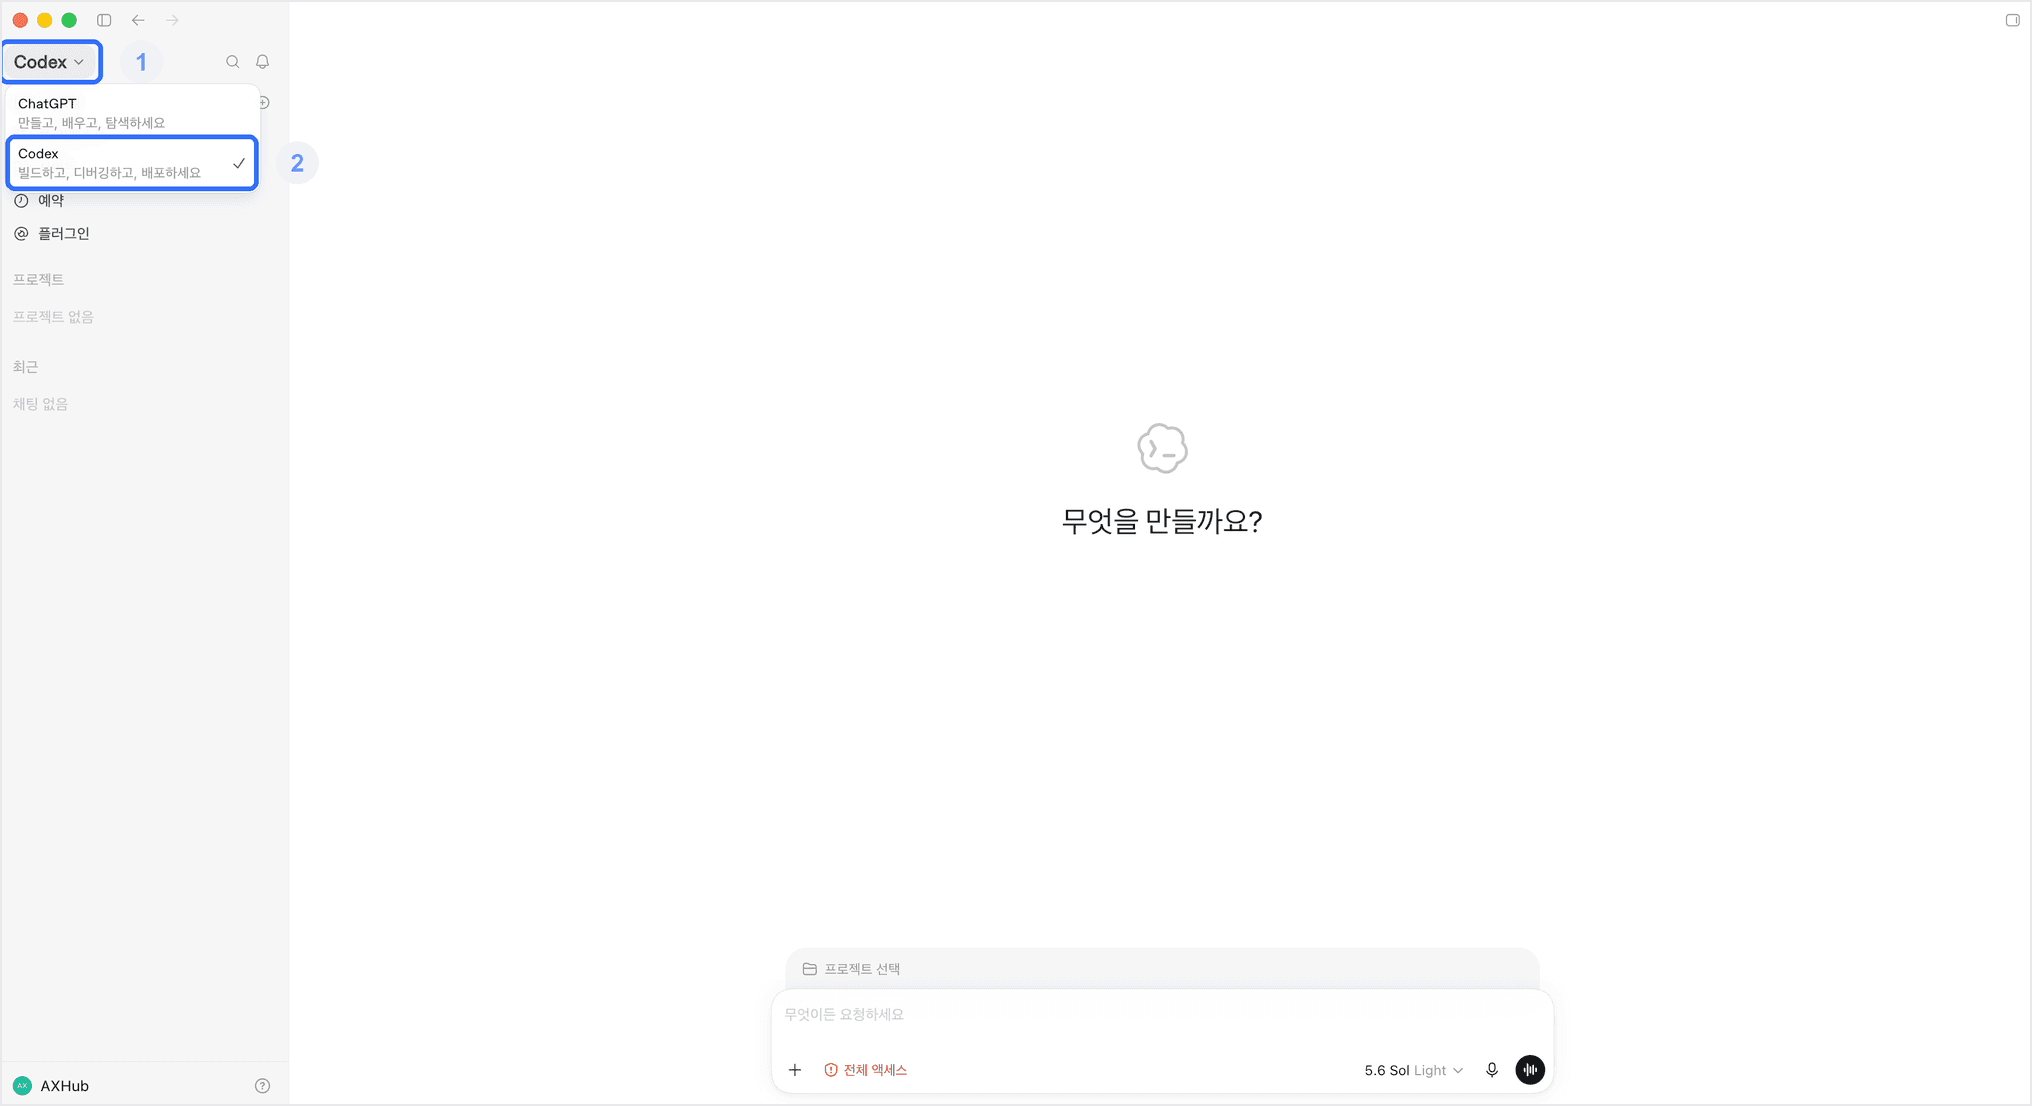
Go to the Plugins page
This step takes you to the screen where plugins are managed.
Click 플러그인 (Plugins) in the sidebar.
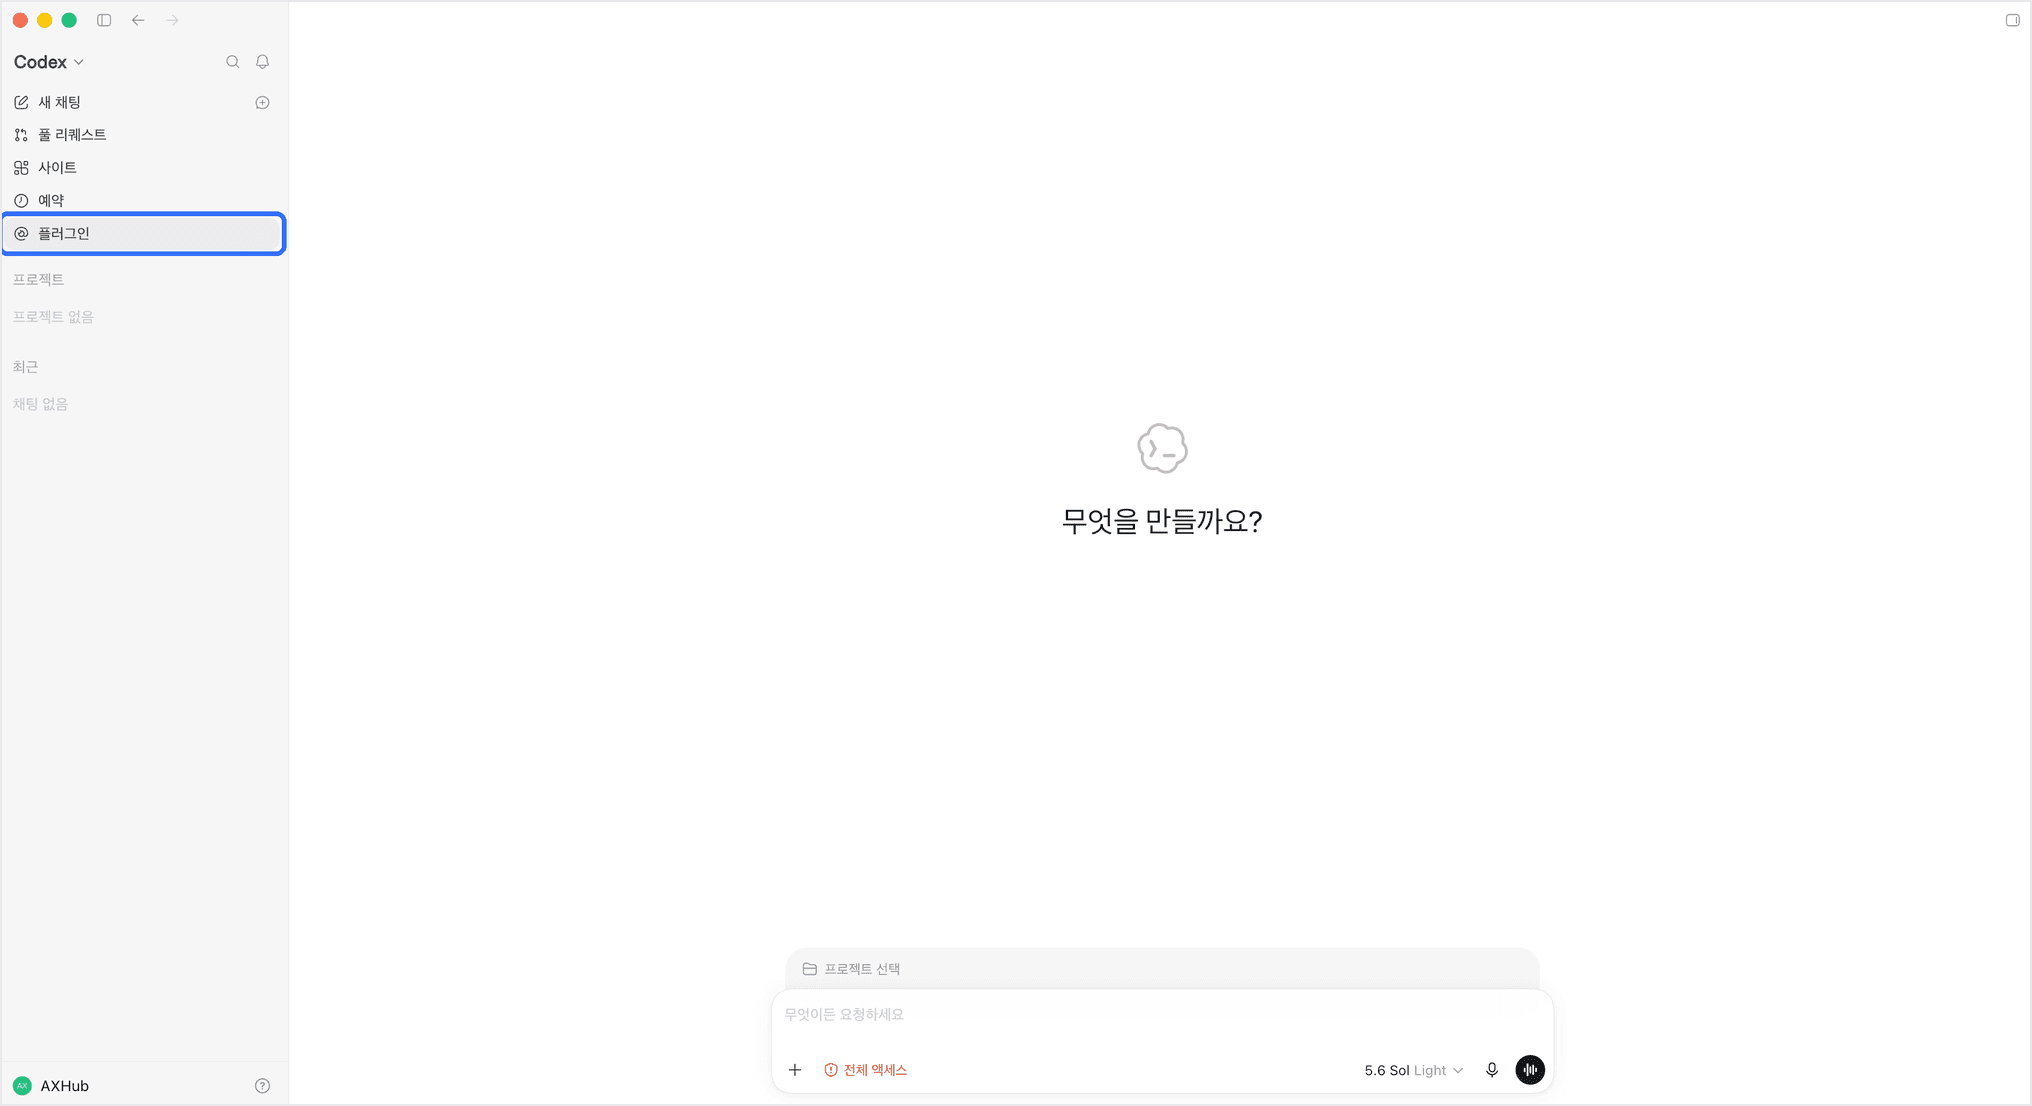
Add the marketplace
This step registers the warehouse (marketplace) that holds the axhub plugin with Codex.
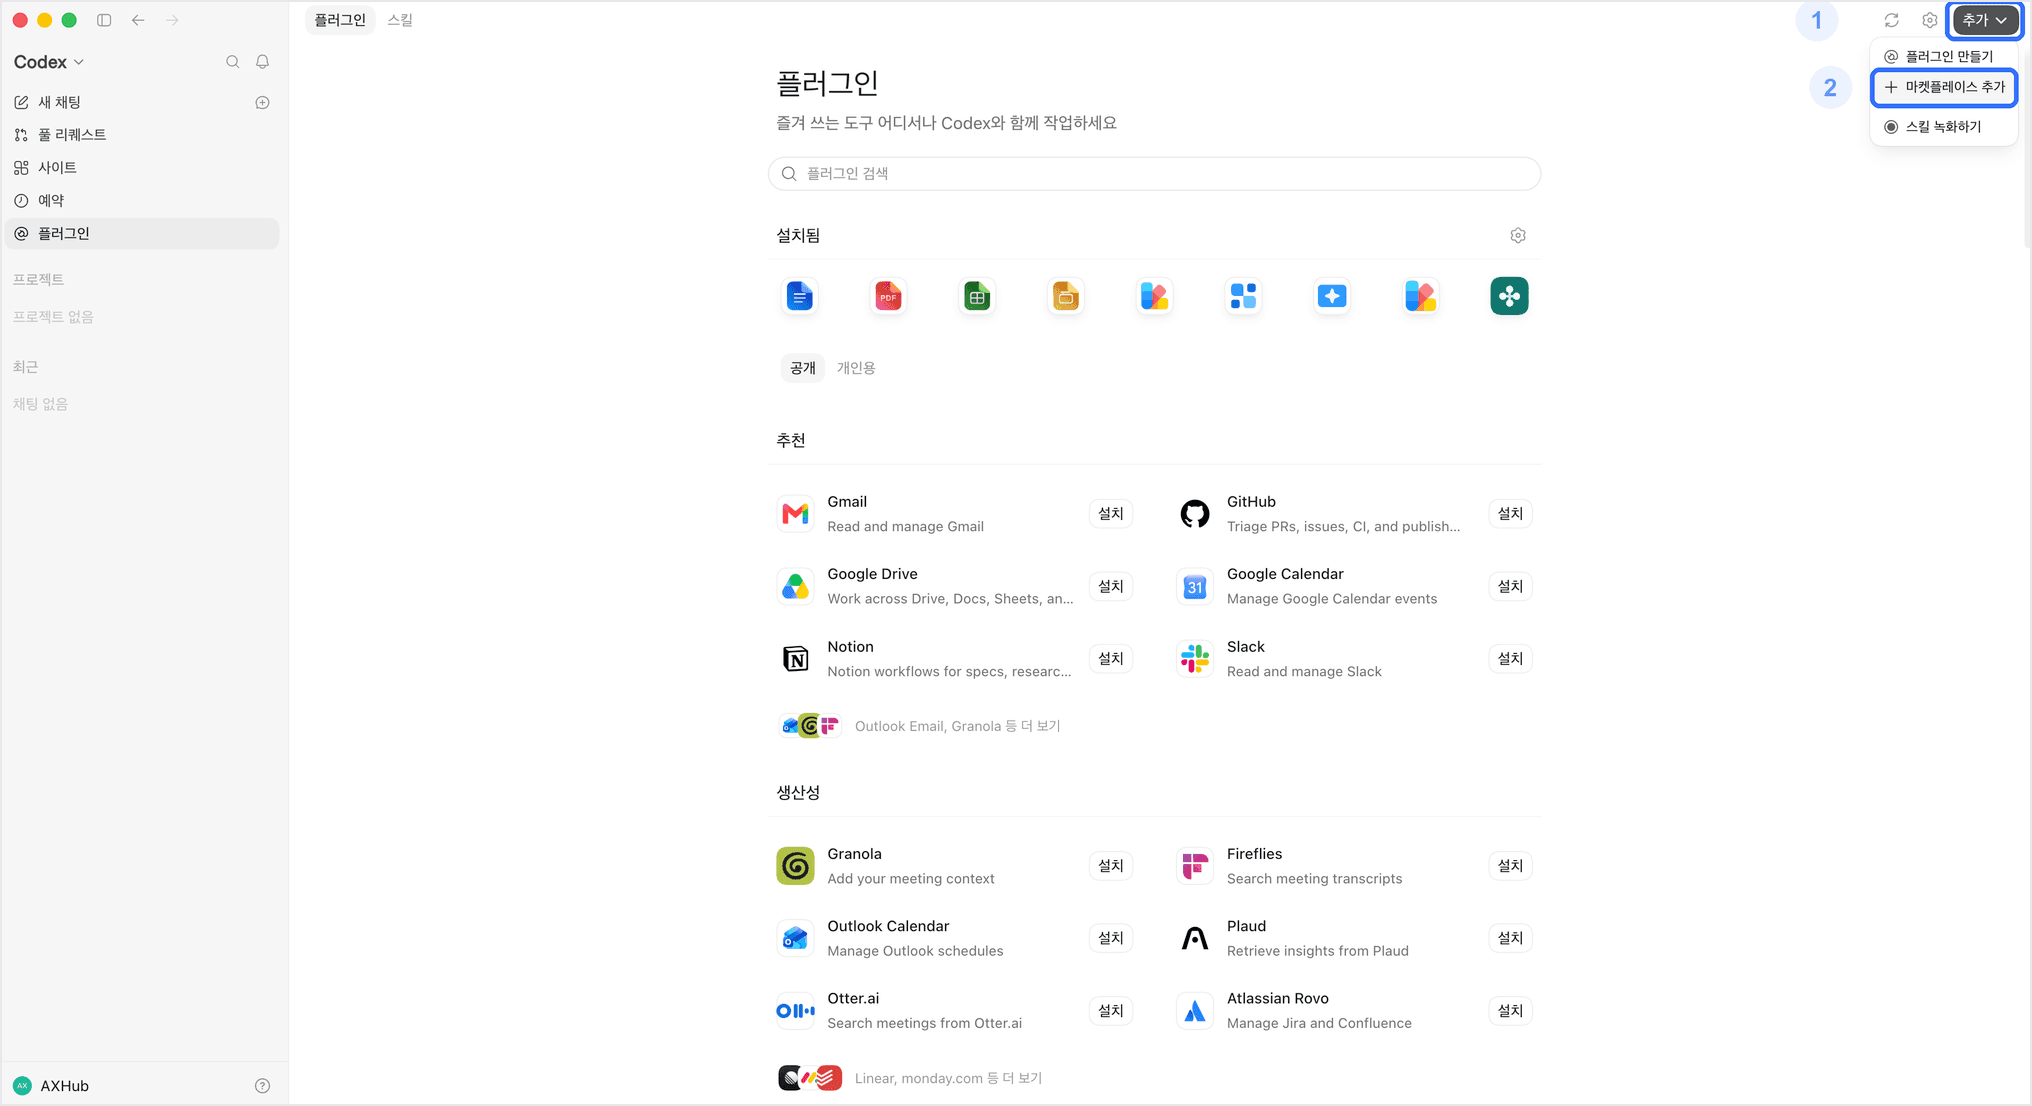
On the Plugins page, click the 추가 (Add) button at the top right, then click the 마켓플레이스 추가 (Add marketplace) button.
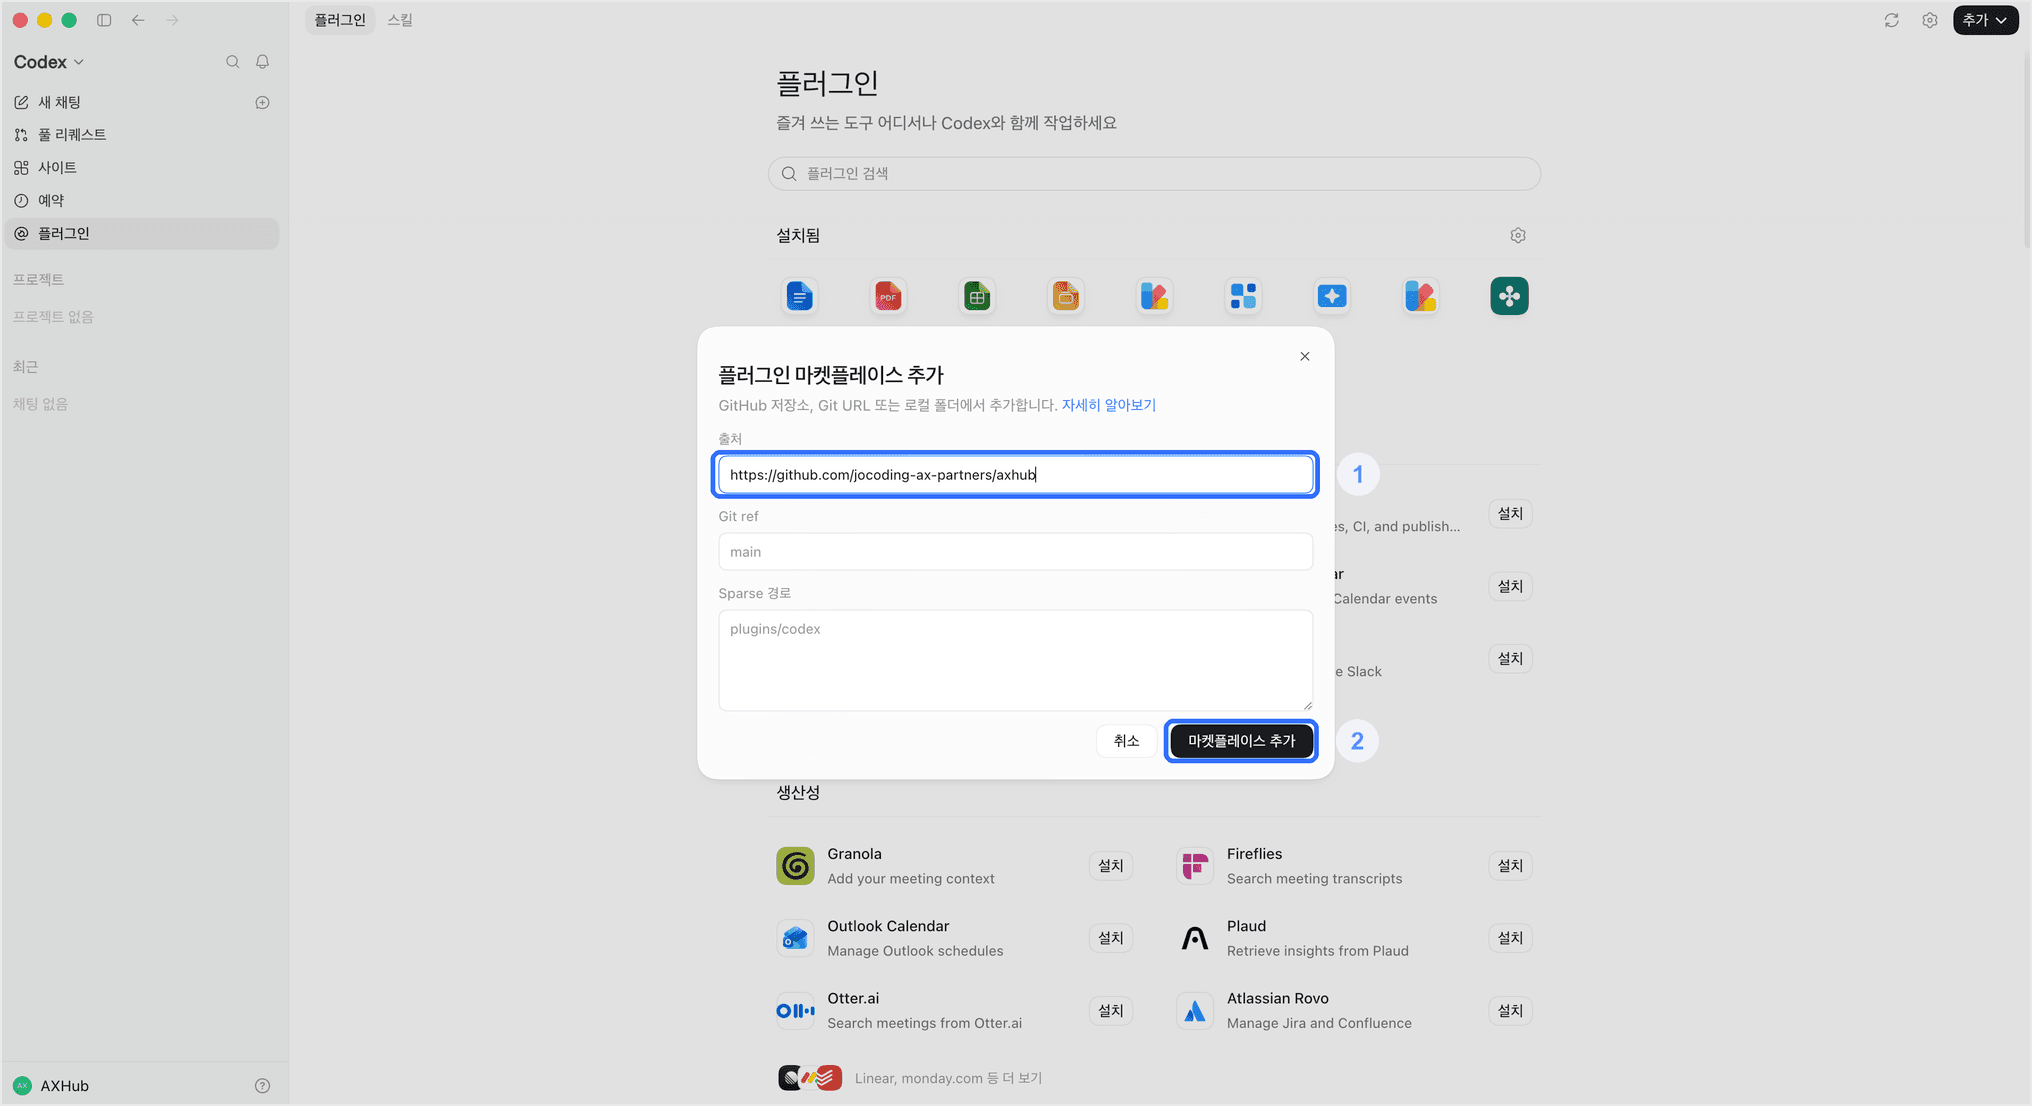
In the add-marketplace modal, copy and paste the address below into the 출처 (Source) field.
https://github.com/jocoding-ax-partners/axhubCheck the URL, then click the 마켓플레이스 추가 (Add marketplace) button.
Install the AXHub plugin
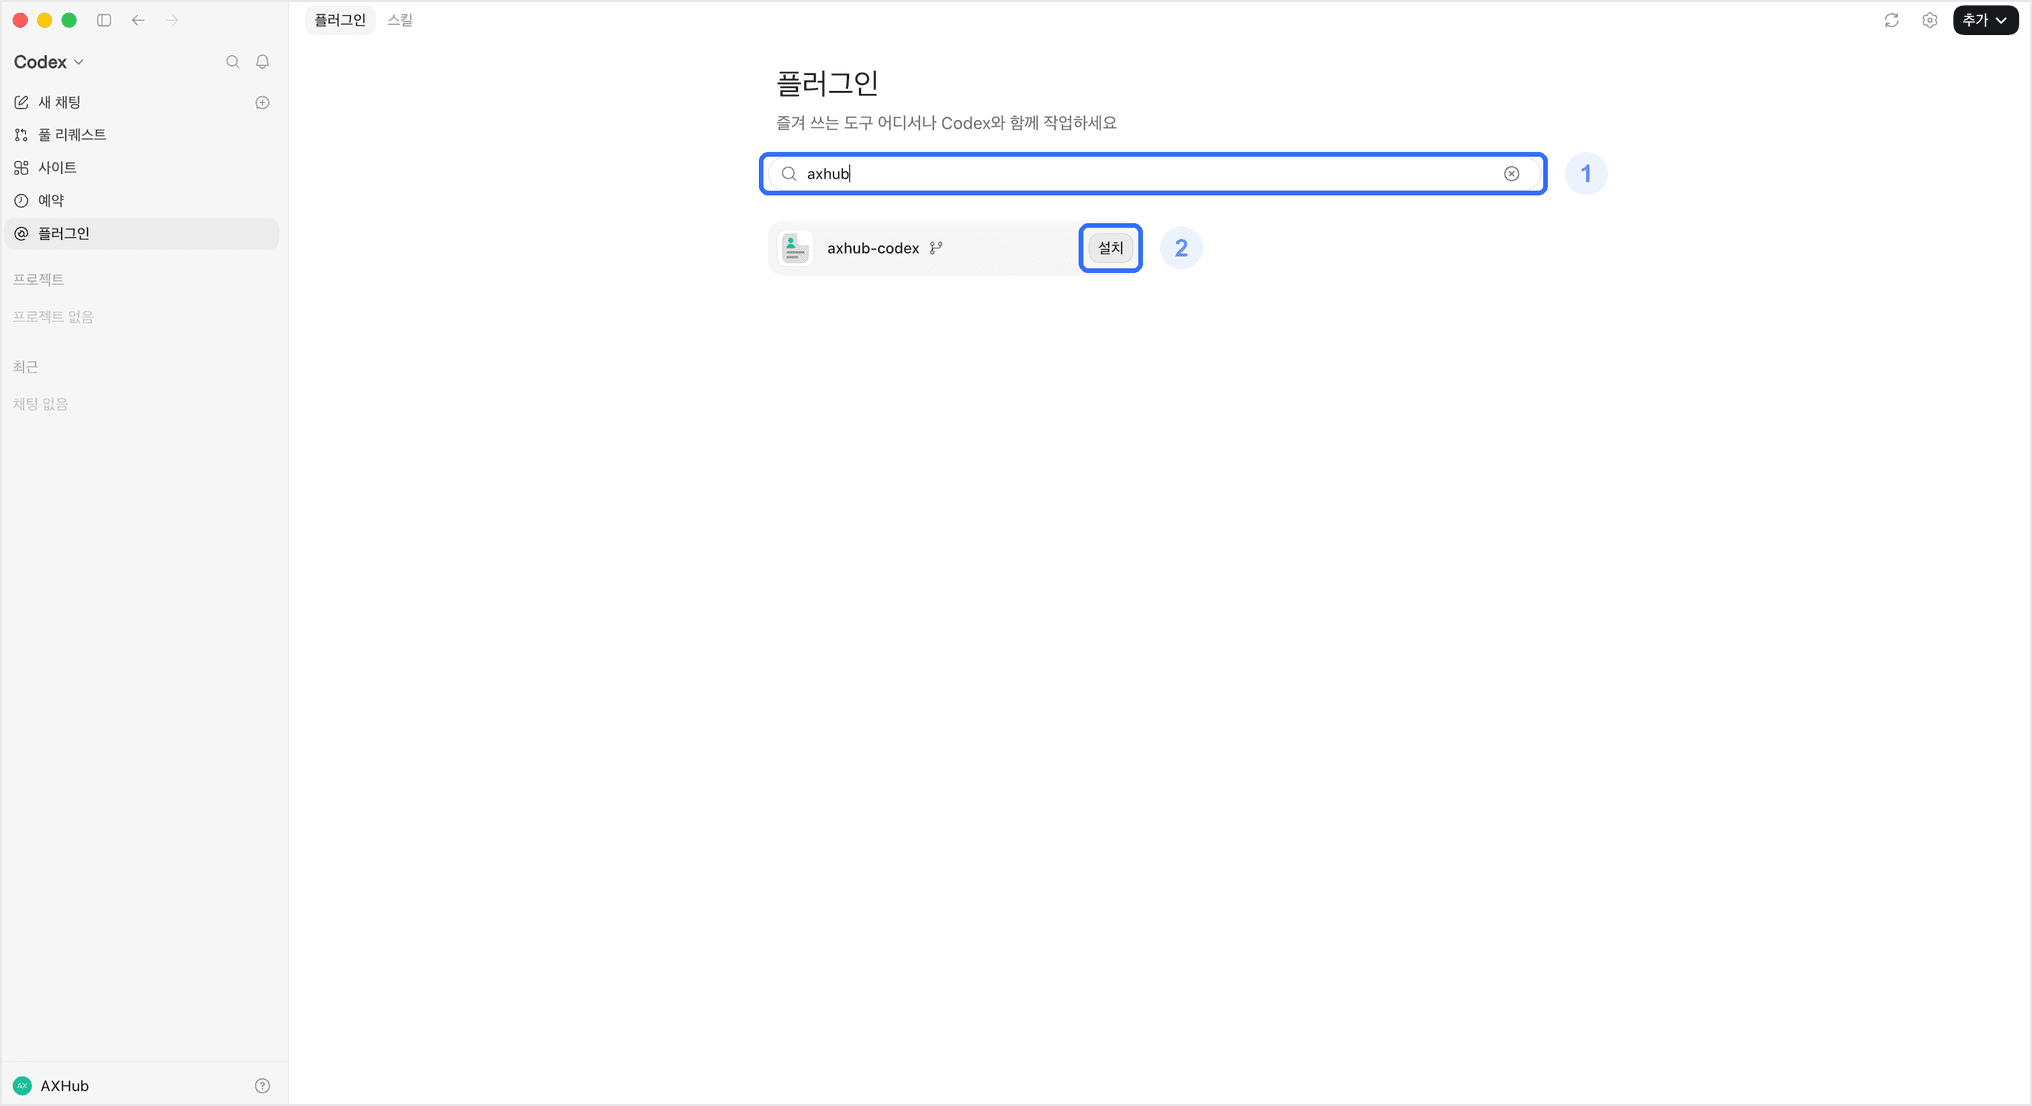
This step actually installs the AXHub plugin from the marketplace you registered. Type axhub in the search box and axhub-codex appears.
Click the 설치 (Install) button and the plugin is installed.
Onboard and create an app
You're all set! In a new chat, ask Codex:
set up axhubIf it's your first conversation, it first asks whether to trust the plugin hooks. Choose trust, and it walks you through the remaining prerequisites (axhub login and so on). Once setup finishes, just say:
I want to create an app on axhubThe plugin runs everything from picking a template to creating the repository and the first deploy, and gives you the app's URL when it's done.
You can do the same thing with axhub commands alone, no plugin involved. It's a good fit for CI scripts, or when you want to set the values yourself.
This tab walks through the commands directly, without AI. Asking an AI to build the app for you (the plugin) is covered from the start in the Quickstart.
Install and log in
curl -fsSL https://cli.axhub.ai/install.sh | bashaxhub auth loginRun this in PowerShell.
irm https://cli.axhub.ai/install.ps1 | iexaxhub auth loginLogging in opens a browser. When it's done, it tells you which company you're connected under.
Create an app (bootstrap)
Create app → create repository → add template code → connect → first deploy, all from one command.
axhub apps bootstrap --name hello --template nextjs \
  --github-owner <github-username> --repo-name hello --execute --watch
Put your own GitHub username in place of <github-username>. For --template, pick one of nextjs, vite, or astro.
Without --execute, it only previews what would be created and stops there. Add it to actually create things.
All methods: confirm the deploy
However you built it, the check is the same.
Open the app's address — every app gets its own address, in the form {subdomain}.{company}.axhub.ai. Open it in a browser, and if the template screen is showing, you've succeeded.
Look in the console — go to your company console ({company}.axhub.ai, e.g. jocodingax.axhub.ai) and open My apps: the app you just made shows up as a card.
Clicking the card opens that app's app console. Deploy status and logs, environment variables, and data all live here.
Managing it after you build it
The app console covers all of the following.
| What you want | Where in the console | Guide |
|---|---|---|
| Check a deploy and roll it back | Deploys tab | Manage deployments |
| Open it up to people at your company | Visibility, inside the Deploys tab | Visibility and access |
| Browse accumulated data as tables | Resources tab → Tables | Connect a database |
| See uploaded files | Resources tab → Storage | Connect storage |
| Set and remove secrets | Resources tab → Environment variables | Set environment variables |
| Decide who gets into the app | App users tab | Visibility and access |
| Snapshot the data and roll it back | Backups tab | Back up and restore |
Tables, storage, and environment variables are grouped into the single Resources tab, and you switch between the three inside it.
Inviting company members and sharing roles is company-wide rather than per-app, so it lives under Members in the admin console — see Invite members, share roles.
Adding features in code
Now open the created repository in Claude Code or Codex and start adding features. This repository is already set up for AxHub (port and structure). Try asking like this.
Add a to-do list screen. Let me enter a title and a due date to save an item,
and check items off as done in the list.
Commit your changes and push them to GitHub, and a new deploy starts.
If you get stuck
- Using the plugin — ask "tell me why the last deploy failed". It pulls the failed deploy's records (logs) and points to the cause.
- In the terminal — run
axhub deploy status <id> --app <app>andaxhub deploy logs <id> --app <app>to see where it stopped. - Fixes by symptom are in Troubleshooting.